How to install an oil temperature gauge
Oil temperature gauges can either be mechanical or electrical. Below is an example of each type of kit. The Lucas mechanical gauge kit consists of the gauge with capillary tube and sender unit (A), and adapter nut and sealing washer (B). The TIM electrical gauge kit consists of the gauge with wiring (C) —which may be mounted via brackets and fixing screws (D) or via an adhesive pad (E) — cable ties (F), sender unit (G), adapter nut (H), and nut, washers and terminal connector (I).
The working temperature of your engine is normally kept to an optimum level
by the cooling system. But there are occasions when your engine is worked
harder and reaches temperatures higher than normal. This can happen, for
example, when you are towing a trailer or another vehicle, or if your engine
has been tuned for higher performance.
As the temperature of your engine increases, the engine oil becomes thinner
and thinner. If the engine is run above normal temperature for a long time,
there is a danger that the oil may become so thin that it can no longer
lubricate the moving parts of the engine properly.
If this happens your engine can become seriously damaged to the point where
it has to be stripped and rebuilt or replaced completely.
Special gauge
While a water temperature gauge gives a fairly accurate reading of the
engine temperature via the cooling system, it does not directly tell you much
about the temperature of the engine oil. For this you need a special oil
temperature gauge.
These gauges measure the oil temperature with a sender unit, similar to that
used for water gauges, which fits directly into the sump pan to give an
accurate reading of the temperature.
The gauges are available from accessory shops and are either mechanically or
electrically operated.
Fitting an oil pressure gauge
The gauges are mounted either directly into the dashboard or in a bracket
suspended under the dash.
How the sender unit is fitted into the sump pan depends on the type of gauge
you have and the model of your car. In some cases the sump pan will have to be
removed and a hole drilled and tapped with a thread to accept an adapter.
Other types use the drain plug in the sump as the fitting position for the
sender unit. Again you may need an adapter to fit the sender.
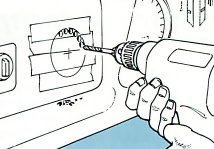
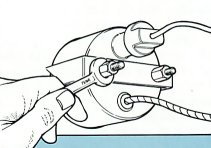
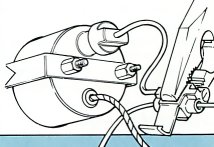
Find a suitable position on the dash to mount the gauge where you can easily see it when driving. If you mount it in the dashboard, make sure no wiring behind will be disturbed. Mark the circumference of the gauge with a felt-tip pen. Alternatively you can mount the gauge on a bracket under the dash. Carefully drill a series of holes around the inside of your felt-tip pen mark. Remove the centre drilled section and, using a rat-tail file, file down the edge of the hole for a neat finish. If you are fitting a bracket, drill out the mounting holes and secure it with self-tapping screws. Fit the gauge into the hole and secure it. Most gauges have a securing bracket which fits on to the back of the gauge over two studs. Tighten the bracket securing nuts so the gauge is held firmly. Some gauges are simply stuck to the surface of the dashboard with an adhesive pad. If you are using an electric gauge refer to the wiring instructions. Connect the appropriate wires to a fused ignition-controlled circuit, the sidelight circuit (for gauge illumination) and an earth point. Pass the sender unit wire through a convenient grommet in the bulkhead and into the engine compartment. If you are fitting a mechanical gauge the capillary tube must be routed from the rear of the gauge, through the bulkhead and into the engine compartment. Drill a hole in the bulkhead and fit a grommet for the tube to pass through. Make sure the tube is away from any hot or rotating parts of the engine. Drain the engine oil. Fit the plug adapter in place of the plug. Screw the temperature sender unit into the adapter and join the wire to the terminal on the sender unit. Refill the engine with oil and test the system. If you need to drill an extra hole in the sump for the sender. How you should interpret the readings on an oil temperature gauge 80-95°C – This is a normal oil temperature for an 100-110°C This is a normal reading if the engine is Below 70°C It is rare for the oil to run too cold, but Note that all engines, whether or not they are fitted with an oil With some kits you have to drill an extra hole in the sump casing to fit Drain the engine oil and remove the sump casing from the engine. Mark Solder the adapter provided in the kit into position in the hole. Make Screw the temperature sender unit into the adapter, remembering to fit


Reading an oil gauge
depends to some degree on the model of your car. But, as a rough guide for
a 2-litre engine when it has been running for some time, the following
holds true:
engine under not too much load.
working particularly hard, for example when towing. Above 110°C The oil
starts to thin out seriously and lose its ability to lubricate the engine
and dissipate heat from components. Check the level of the engine oil and
inspect the sump pan to make sure it is not covered with heavy deposits of
dirt.
this can happen with cars fitted with an oil cooler. If the temperature
drops below 70°C suspect a faulty oil cooler thermostat.
cooler, are prone to low oil temperature in cold weather, even though the
water temperature reads normal.Drilling a sump hole
the temperature sender unit. Check with your dealer first, or the gauge
manufacturers, to find out where such a hole can safely be drilled.
and drill the hole in the required position.
sure all metal flakes from the drilling have been removed before refitting
the sump.
any sealing washers first. Fill the engine with oil and test the gauge to
ensure it is working.