Update your charging system
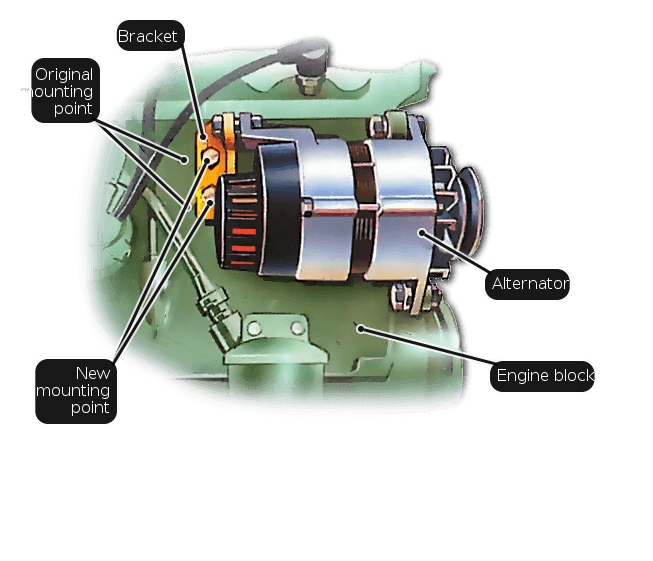
Move the existing bracket forward to a new mounting point.
Extra longbracket Fit an extra-long bracket to the original mounting point.
Steel tubeextension Extend the alternator mounting point with a length of steel tube. If there is a second mounting point on the engine block, or if you can buy It should fit snugly, but you may find that the rear mounting point on the Use a ruler to check that the pulley is in line with the crankshaft and If you have to use the existing dynamo mounting point, first bolt the Now tap the tube on the rear mounting as far through the bracket as it will Fit a long bolt through the rear bracket on the engine and pass it through Fit the eye connector end to the starter solenoid. Fit an eye connection to one end of your cable and a multi-connector Fit the multi-plug end to the alternator + terminal. Move the small wire from dynamo F to alternator IND. Join up the dynamo F and WL wires. Alternator wiring diagram. Attach the small terminal that fitted to the dynamo F terminal to the At the voltage regulator, disconnect the F and WL wires and join them together. The full wiring diagram, with cable sizes, is shown. Attach the slotted adjuster strap to the alternator and to its mounting You may find that you have to bend the slotted strap to make it fit. If that The alternator needs to be connected to the ignition warning light and to Attach a suitable connector to each end of the cable, and connect it to one Run the cable to your chosen live point following the wiring loom. Use cable Now find the small wire that was connected to the dynamo F terminal Connect Do the same with the wire on the WL terminal. Join the two wires together, Fit the drive belt and tension it and reconnect the battery. Turn on theSimple mounting
and fit a conversion bracket, offer up the alternator to its mounting
points.
alternator does not butt up to the bracket on the block. If so, you need to
adjust the alternator’s rear mounting. Find the short metal tube on the
mounting and use a small hammer to gently knock this tube forwards or backwards
until it just touches the mounting bracket. Now bolt the alternator in
place.
water pump pulleys. If it isn’t, you will have to place washers between the
alternator and its front bracket until it is level.Existing mountings
alternator to its front mounting point. Check the alignment of the alternator
pulley (see above).
go. If it doesn’t reach the rear mounting on the engine, cut a length of metal
tube to run between the end of the tube and the bracket on the engine.
the piece of tube you cut. Push it through the rear mounting point on the
alternator, then fit a washer and nut to it – leave the nut loose for now.Electrical work
plug to the other end. Then attach the eye end to the starter solenoid
or battery live terminal and the other end to the ± terminal on the
alternator.
alternator IND terminal using the multi-plug.Adjustment
point on the engine. Ensure that the alternator pivots freely.
does not work you will need to buy the correct strap for the alternator. Fit a
new generator drive belt and tension it correctly.Wiring up
either the input terminal on the starter solenoid or the live battery terminal.
Using 97/.012 (97/.30) cable, measure how much you need and cut it to
length.
of the large terminals in the rear of the alternator marked + (it doesn’t
matter which one).
ties or insulating tape to secure the cable. Connect the free end of the cable
to the starter solenoid or battery terminal.
it to the terminal on the rear of the alternator marked IND. Next move to the
voltage regulator unit, and find the terminal marked F or DF and pull off the
wire from it.
and insulate them. You can leave all the other wires attached to the voltage
regulator – it acts as a useful junction box.
ignition, and check that the ignition warning light comes on. Start the car and
ensure the light goes out – you may need to blip the throttle for a second to
help it.