Bleeding the brakes
The front and rear brakes of a dual-brake system have separate hydraulic circuits.
The configuration can vary depending on the manufacturer.
The brake pipes also pass through a balance unit which limits pressure to the rear brakes to prevent the back wheels locking when the weight of the car is thrown forwards during braking.
On some cars, the rear brakes cannot be bled if the weight is taken off the wheels, and the job must be carried out with the car on the ground.
The fluid is hygroscopic, which means that over a period of time it absorbs water from the atmosphere, and its boiling point is lowered.
Friction caused by continual heavy braking heats the fluid in disc calipers or wheel cylinders, and its water content turns to steam. The brake pedal feels ‘spongy’ when you press it, and in severe cases the brakes will fail completely.
Air leaking into the hydraulic system makes the pedals spongy because, unlike brake fluid, it can be compressed.
If the pedal feels spongy before the fluid is due for replacement, check the system for leaks. Air can be drawn in through leaking seals or faulty brake pipes (See Looking for leaks in the brake system).
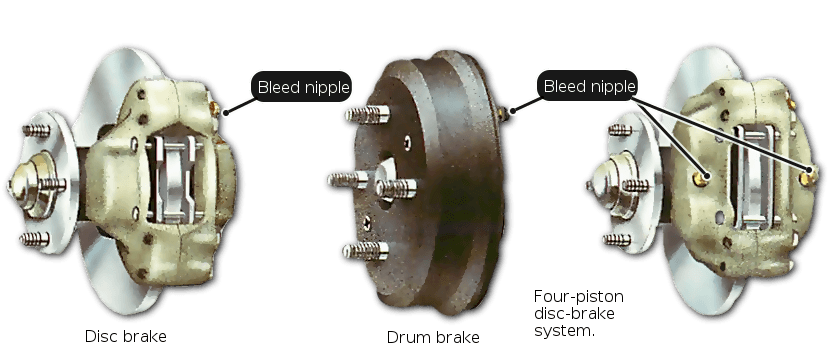
Bleed nipple
Bleed nipple
Drum brake
Four-pistondisc-brakesystem.
Disc brake If you find a leak, first replace the faulty components and then renew the brake fluid by bleeding the complete hydraulic system. The fluid is drained from the system by opening bleed nipples – which are small valves – on each caliper or wheel cylinder in turn and pumping the brake pedal. At the same time the master-cylinder reservoir has to be topped up with new fluid at frequent intervals, because its level drops as the old fluid is drained off. If the reservoir empties, air will get into the system and the whole process will have to be repeated until all air is expelled. Keep it topped up as near as possible to the level mark on the side – you need a helper, unless you have a bleed pipe with a non-return valve in it (See Bleeding the clutch). Avoid spilling brake fluid on paint-work – it will start to penetrate within a few seconds. If any splashes on, hose it off immediately and wipe the area with a clean rag. Wash your hands thoroughly if it gets on your fingers. On many cars you can reach the bleed nipple with the road wheel in place. But it is usually simpler to remove the wheel (See Checking, removing and refitting road wheels). On dual-circuit brake systems, it is usual to start bleeding at the front-wheel brake which is nearest to the master cylinder – normally the one on the driver’s side. Bleed the other front wheel and then the rear wheels, ending with the one furthest from the master cylinder. Cars with servo-assisted brakes (See Replacing a master cylinder and servo unit) may have a bleed nipple on the servo unit. If so, start with that.
4
3
1
2
Simple system bleed sequence A single hydraulic brake pipe carries the brake fluid to each wheel. A leak affects all the brakes. Bleeding a single-circuit system: Start at the wheel furthest from the master cylinder, and end at the nearest. Bleeding a four-piston system
1
4
6
2
3
5
Four-piston system bleed sequence There are two sequences for bleeding a four-piston system, involving one nipple at the rear and two at the front. A variation of the dual-circuit system has front disc-brake calipers with two pistons and cylinders in each caliper. Each cylinder has a bleed nipple, so that there are at least two nipples on each caliper. One half of the master cylinder feeds fluid to the back brakes and to one of the pistons in each caliper; the second half feeds the other two pistons. A typical bleeding sequence is to start with a rear brake then bleed the two front-caliper nipples on the same side of the car. Repeat the sequence on the other side. There are two sequences for bleeding a four-piston system, involving one nipple at the rear and two at the front . The bleeding method for drum brakes, disc brakes and combination systems is the same. Different brake types on the same car may have different nipple sizes, and you must use the correct size of ring spanner for each one. If a road wheel has to be removed, support the car on axle stands and chock the other wheels. Clean off dirt and corrosion around nipple with a wire brush. Wipe the nipple clean with a piece of rag. Remove dirt and corrosion from the bleed nipple with a wire brush, take off the dust cap (if there is one) and put a ring spanner of exactly the right size over the nipple. Leave the spanner in place and attach a length of clear plastic tubing to the nipple. The tubing should be about 2 ft (600 mm) long, and an airtight fit on the nipple. Place a clean glass container, such as a jam jar, under the nipple, and put the free end of the tube into it. Pour enough fresh brake fluid into the jar to cover the end of the tube. Take care when opening the bleed nipple. They are often difficult to turn, and fragile enough to fracture if excessive force is used. The nipple is made of soft metal and can be damaged easily if the spanner is a little too large. A corroded nipple can easily break off; if it does, the remains may come out with a screw extractor. Otherwise you may have to buy a new brake caliper or wheel cylinder. If the nipple does not turn with a reasonable amount of force, put a drop of penetrating oil on the thread and allow a few minutes for the oil to penetrate. Loosen the bleed nipple about half a turn, and leave the spanner in place. Brake fluid should begin to ooze from the nipple and flow down the tube into the jar. If it does not, the nipple may be blocked, and you must open it (see top right). When the brake fluid is flowing, ask your helper to pump the brake pedal while you watch the fluid run through the clear tubing. More than a few strokes may empty the master-cylinder reservoir, so remember to keep checking it and top it up if necessary. After bleeding, be sure to retighten the nipple before removing the bleed tube. If you see bubbles – they may be quite small, like froth – there is air in the system. Continue pumping (and topping up) until there are no more. Tell your helper to pump twice more, then keep the pedal depressed. Close the nipple by tightening it with the spanner. Remove the tubing and the spanner, replace the road wheel and move to the next nipple. Fit the correct size of ring spanner over the nipple, then attach the bleed tube. Loosen the nipple about half a turn – fluid should flow into the jar. Make sure that the end of the tube is below the fluid in the jar. Bleeding brakes using a tube with a non-return valve (See Bleeding the clutch) involves exactly the same procedure, but you do not need a helper. Frequent checks must be made to see if air bubbles are passing through the tube. The same methods are used if you are bleeding the system simply to replace fluid, and not expel air. Six strokes of the brake pedal with each nipple open in turn should pump out the old fluid and replace it with new in each part of the system. Make sure you retighten each nipple before moving to the next. The pumping sequence may vary with different types of master cylinder. When you have bled all the nipples, apply hard foot pressure to the brake pedal. It should no longer feel spongy. If it does, there is still air in the system. Repeat the bleeding process, possibly in a different sequence, until the pedal feels firm. It should remain equally firm under hard and prolonged pressure, without sinking to the floor. To test the brakes on the road, wait until there is no traffic, drive slowly for a short distance and press the brake pedal as you would normally. The car should pull up quickly and in a straight line, and the pedal should not feel spongy. Drive on at normal speed and apply the brakes firmly. Again, the car should stop quickly, in a straight line and in about the same distance. Try a few more applications – if the sponginess returns, there is still air in the system. Repeat the bleeding process until you are satisfied that the brakes are operating correctly. If your bleed nipples are not fitted with dust caps, buy some and fit them after bleeding. Brake-hose clamp If bleeding does not begin when you open a nipple, it is probably blocked. Use a brake-hose clamp (See Looking for leaks in the brake system) to seal the flexible hose leading to that brake, take off the tubing and unscrew the bleed nipple completely. Carefully poke the nipple clear with a thin wire. Carefully poke the nipple clear with a piece of stiff, thin wire. Replace the nipple tightly, refix the flexible tubing to it and remove the hose clamp. Do not attempt to clear a blocked nipple without removing it; dirt dislodged could find its way into the slave cylinder. Loosen the bleed nipple half a turn, and the fluid should begin to flow. An aluminium-bodied centre-valve (CV) master cylinder (single-circuit type). There are two types of master cylinder – the aluminium-bodied centre-valve (CV) type and the cast-iron compression-barrel (CB) type. Each calls for a different pump action in the brake pedal when you bleed it. That applies whether they are single or dual-system units. With the CV type, push the pedal down fully, then give it three short, quick strokes near the bottom of its travel and release it fully. A cast-iron compression-barrel (CB) master cylinder (dual-circuit type) Repeat at once, and continue the sequence until there is no more air coming from the bleed nipple. With the CB type, push the pedal down fully to the floor, then let it rise slowly. Wait for three or four seconds, then repeat the process until all air has been expelled. If one method of pumping does not clear bubbles from the fluid, and you have tried a different bleed sequence, use the other pumping action.Removing air from a brake system
Opening blocked nipples
Pumping correctly for different master cylinders