Replacing a drum-brake wheel cylinder
This is a leading-and-trailing-shoe brake: a two-leading-shoe brake has two cylinders.
Brake fluid is generally renewed when a leaking or sticking wheel cylinder on a drum brake is replaced with a new one.
However, if the fluid has been renewed recently, or it is not convenient to replace it, you can take steps to keep fluid loss to a minimum while replacing the cylinder.
Such precautions also make the system easier to bleed after it has been reassembled.
Detaching the cylinder
Screw down the reservoir cap over a sheet of thin plastic.
Take off the master-cylinder reservoir cap and, if possible, screw it back on over a sheet of thin plastic stretched over the mouth of the reservoir.
The plastic sheet blocks the breather hole in the cap and creates a vacuum when the fluid level drops, preventing all but a little of the fluid from escaping.
Seal off the flexible brake hose with a hose clamp.
If there is a flexible hose leading into the brake, clamp it off with a brake-hose clamp, taking care not to damage the hose.
With rear brakes on a live axle, clamp the flexible hose(s) connecting the brake pipe on the chassis to the one on the axle.
Loosen the union before freeing the wheel cylinder.
Remove the brake drum and shoes (See Renewing drum-brake shoes). Loosen the brake-pipe union at the rear of the wheel cylinder, and unbolt or unclip the wheel cylinder before uncoupling the brake pipe from it.
The method varies according to type but fixings with bolts or nuts are likely to be stiff, and it is best to apply penetrating oil to them a few hours beforehand. Make sure non gets into the drum.
Removing an E-clip, single and double bolts
Two-bolt fixing method – remove both.
If the cylinder is fixed by a single stud, you need remove only one nut and lock washer to free it. The cylinder has a projection which fits into the backplate to stop it from turning.
If the cylinder is held by two bolts, remove both to free it.
The E-clip fits on concave side first.
There may be a gasket between the cylinder and backplate; the gasket must be renewed – a new one should be supplied with a new cylinder.
The circular base of the cylinder projects through the backplate. A pin prevents it from turning. Outside the backplate a spring clip shaped like a round capital ‘E’ fits around a groove in the projection to hold the cylinder in place.
Lever off the clip with a screwdriver and discard it.
Renew both the clip and the gasket under the cylinder: replacements should come with the new cylinder.
After fitting the new cylinder and gasket to the backplate, drive the new clip on to the projection by pressing it on with a suitable-sized socket and tapping this with a hammer. The concave side of the clip goes next to the backplate.
Removing a sliding cylinder
Slide off the clip by tapping each leg with a hammer and screwdriver.
The base of the cylinder projects through a slot in the backplate, in which it is free to slide.
Outside the backplate two interlocking spring clips, pushed on to the projection from opposite sides, hold the cylinder in the slot.
Sometimes there is a single spring plate with two non-springy clips. There is usually a dust cover to seal the slot.
Pull back the dust cover. If there are two spring clips, slide off the outer one by tapping each of its two legs alternately a short way with a screwdriver and hammer.
Slide off the inner clip in the opposite direction.
Sometimes you have to remove the handbrake lever arm so that you have room to remove one of the clips.
If there are two clips under a spring plate, slide the clip next to the handbrake lever as far towards the lever as possible.
Push the other clip in the same direction until you can ease its end under the spring.
Push the first clip down to lift the spring off the second clip. Pull the second clip free, and lift off the plate and the first clip.
Again you may have to remove the handbrake-lever arm or bleed nipple to free the cylinder from the backplate.
Clean both sides of the slot in the backplate and smear with a little brake grease. On reassembly make sure the dust cover fits properly and securely so that no dirt or spray can enter and cause the cylinder to seize.
Removing the brake pipe
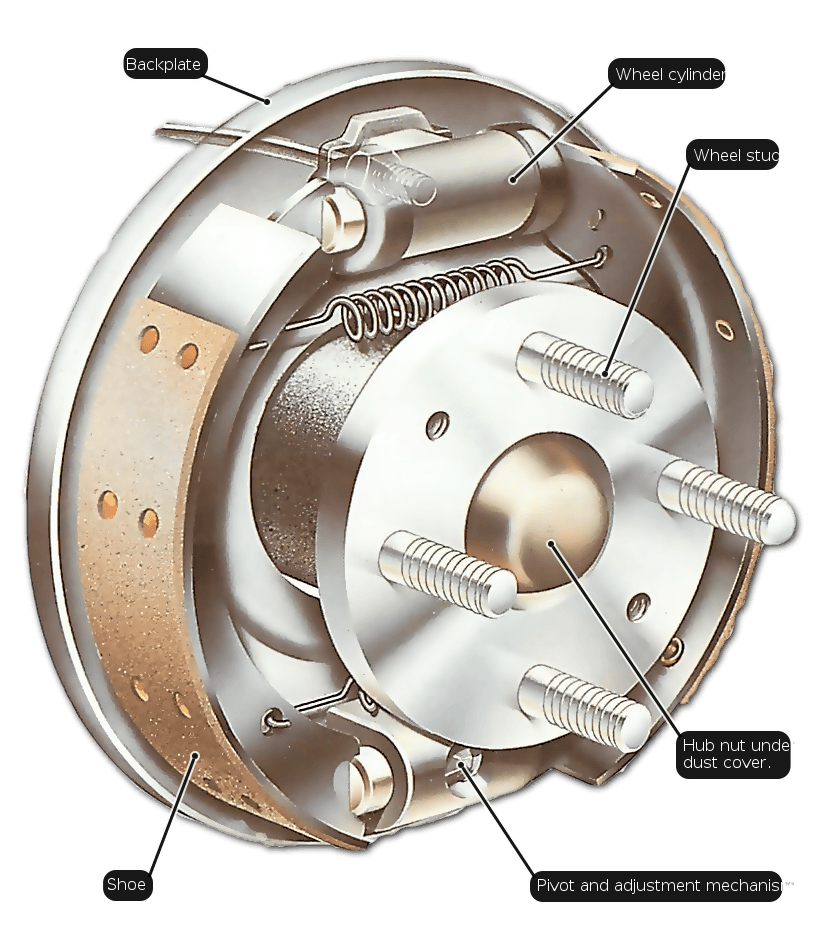
Wheel stud
Backplate
Wheelcylinder Use the wheel cylinder to pull the brake pipe through the backplate. Hold the union nut steady with a spanner, and twist the cylinder to free the union completely. When removing the brake pipe, loosen the union nut before taking off the wheel cylinder. When the cylinder is free, use it to pull an inch or two of brake pipe through the backplate. Sometimes the bleed nipple must be removed before the brake pipe can be pulled through. Save its small cap. Hold the union nut steady with a spanner and unscrew the union by twisting the cylinder. This method of removal avoids twisting the brake pipe. Unions tend to be stiff and corroded. Apply penetrating oil a few hours before unscrewing one – make sure none gets into the drum. When you unscrew the union nut, always take care not to twist the pipe or hose. With a metal pipe, make sure that the nut is turning on the pipe and not twisting the pipe with it. Also, brake-pipe union nuts are soft, so use a well-fitting spanner of the correct size and ensure that the nut is fully in the jaws. A difficult nut may need a self-locking wrench to start it. Seal the end of the disconnected brake pipe with a polythene bag held by a rubber band. Seal the end of a disconnected pipe or hose temporarily with a rubber plug, or a polythene bag held on with a rubber band. Do not touch the brake pedal. If a nut seizes, do not try to force it off with a spanner or you may ’round’ the corners and make it even harder to turn, and the spanner will begin to slip. Instead, apply penetrating oil, leave it to soak in for a while, then use a self-locking wrench. Clean the backplate with a wire brush. Clean the backplate, and wire-brush the pipe union(s) and nut(s). Wipe away grit and flakes of rust. Screw the union(s) together finger-tight, taking care to avoid cross-threading. Check that the belled end of the brake pipe is clean and undamaged. Fit the new cylinder by reversing the steps you took to remove it. Tighten the union(s), being careful to avoid twisting a pipe or hose. Screw the brake-pipe union on finger-tight before fitting the wheel cylinder. When the wheel cylinder is fitted, tighten the union. Refit the brake shoes (See Bleeding the brakes), and adjust them if they are not self adjusting. Uncover the reservoir.Reassembling the cylinder